
4 posts tagged with "web3"

View All Tags

Deploying Smart Contract to a Real Network

· 3 min read

In the previous two articles, we learned how to create and test a smart contract. In this article we focus on deploying a smart contract to a real network. Here are the links to previous two articles.

  1. How To Create Your First Smart Contract
  2. Testing Smart Contract Using Hardhat

You need to go through above two articles to better understand this article.

Deploy Script

When we say real network, there are networks like Darwinia or Mainnet. But these networks are paid and we are not going to use them now. We can spin up real network in our laptop itself as a localhost network. We will see how to do that soon.

Now, under scripts folder, create a new file deploy.ts. The file name can be anything. What we are going to do next is very similar to what we did in contract testing.

First, add package references to the file.

import "@nomiclabs/hardhat-ethers";
import { ethers } from "hardhat";

Next, we add a function that can deploy a contract to a network.

const deploy = async () => {
const HelloWorld = await ethers.getContractFactory("HelloWorld");
const hello = await HelloWorld.deploy();
await hello.deployed();

return hello;
};

deploy() function creates a contract hello and returns the contract once it is deployed in network.

We now create a handler function sayHello() that can take a contract and invoke it.

const sayHello = async (contract) => {
console.log(await contract.hello());
};

Next, we call both deploy() and sayHello() functions.

deploy().then(sayHello);

Run Deploy Script

In order to run the deploy script, we need to first go to the terminal and navigate to our project folder. There, execute following command.

npx hardhat run scripts/deploy.ts --network localhost

Instead of deploy.ts, you need to substitute with the file name you have given. Above command tells to do the deployment in local network. For that there has to be a local network on the first hand.

If you are running above command for the first time, you will receive an error message saying:

(node:30727) UnhandledPromiseRejectionWarning: HardhatError: HH108: Cannot connect to the network localhost.

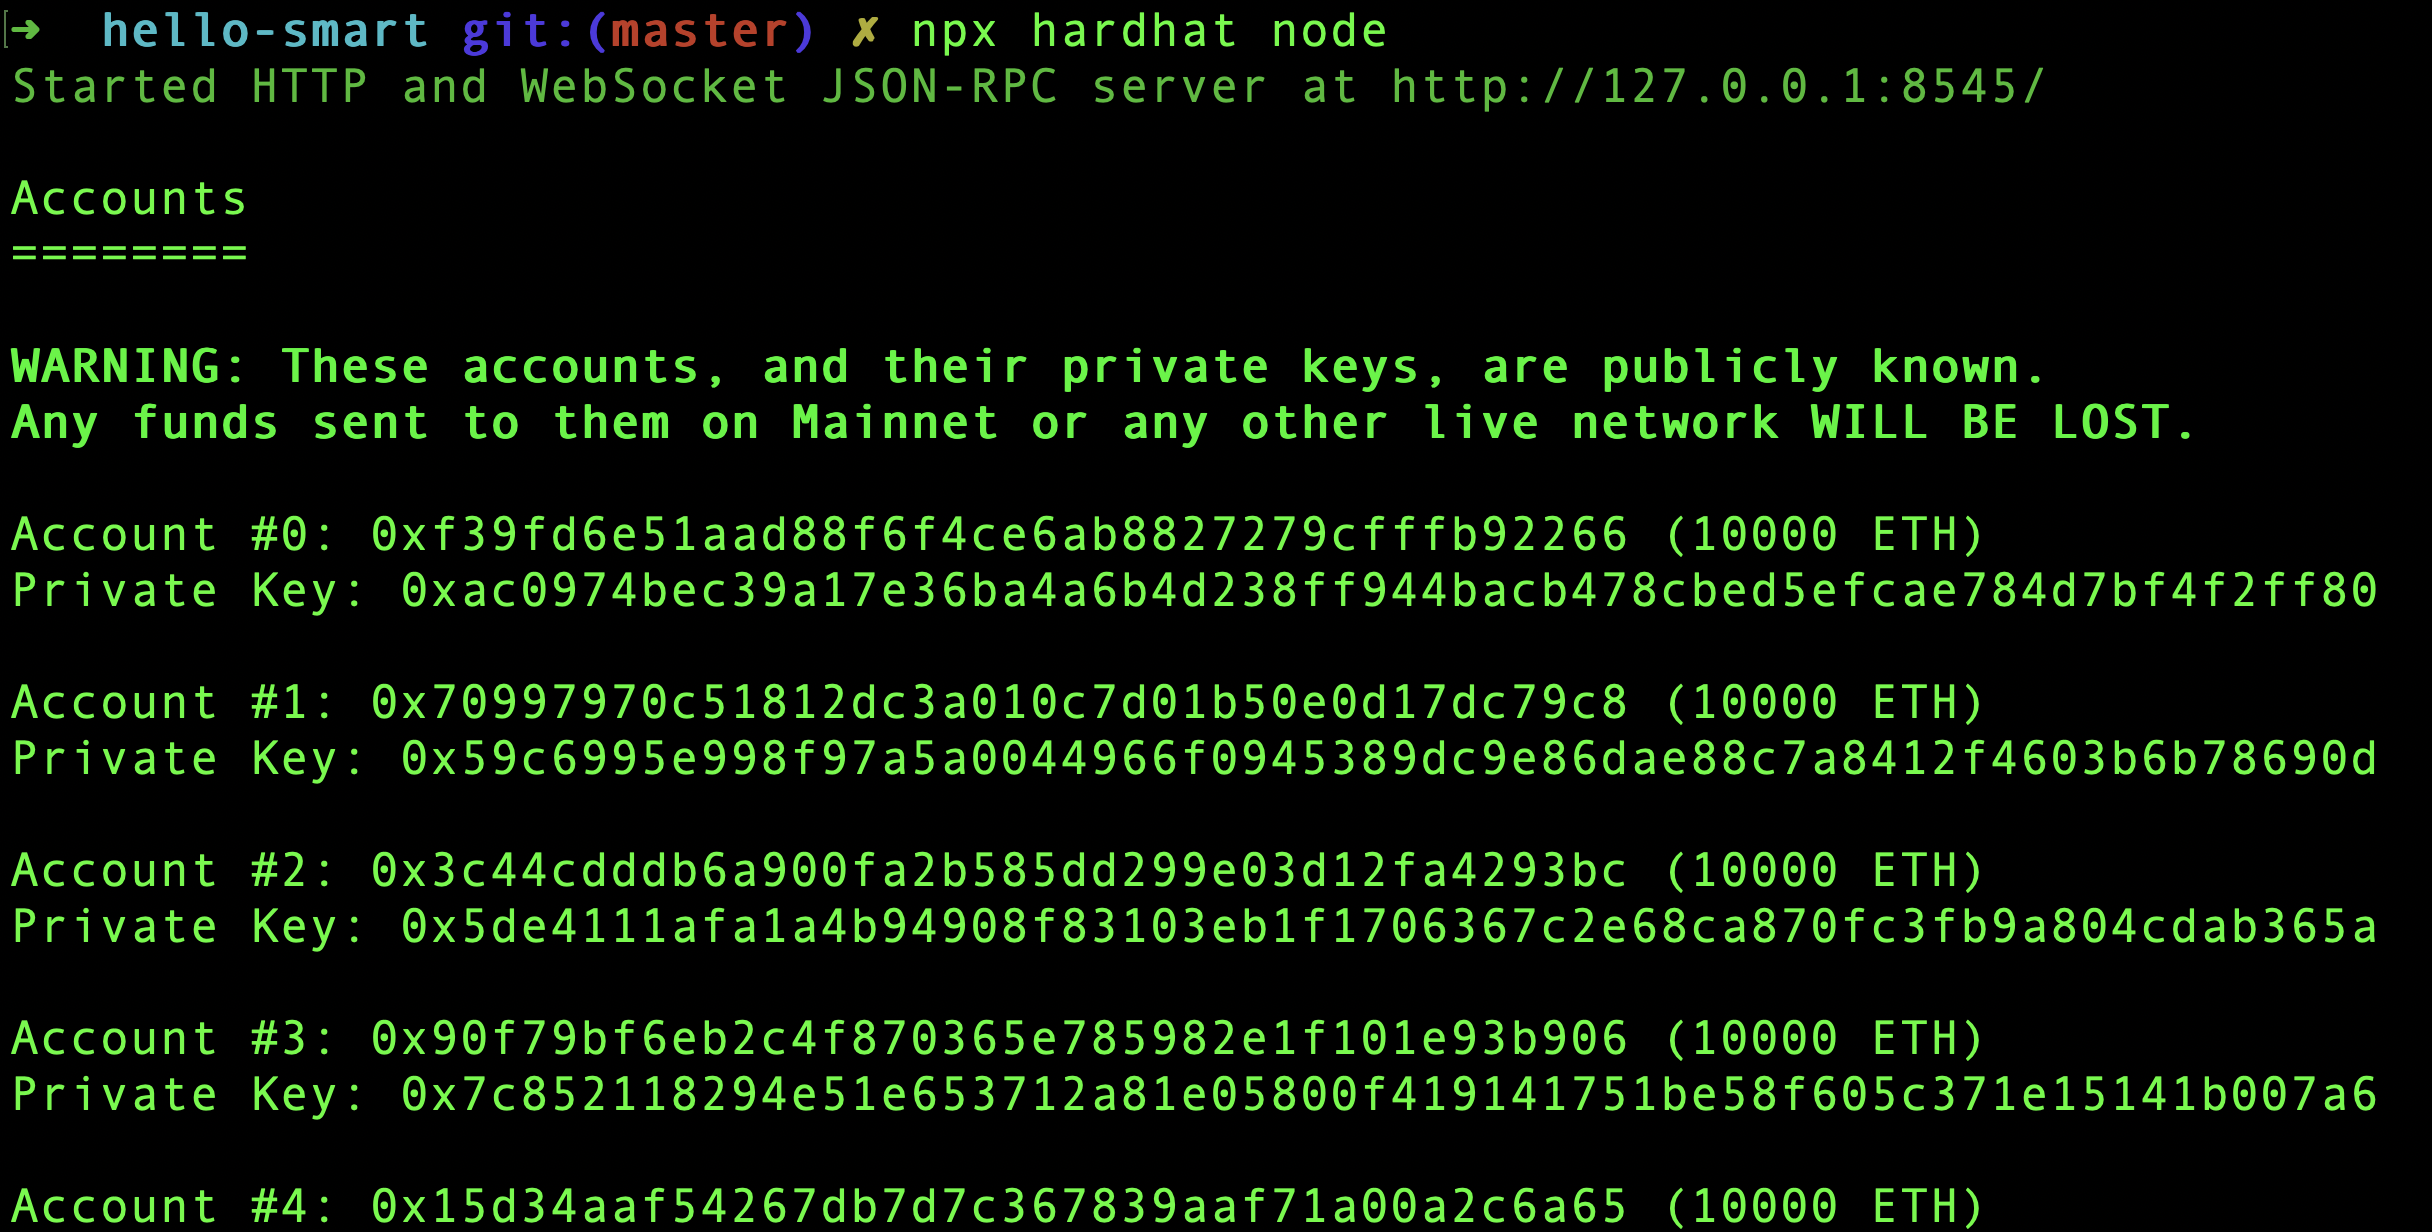
This is because in order to deploy to a network, first the network nodes should be present in localhost. For that run below code to create nodes in a new tab. We run it in a new tab, because the process will be running without giving back the command prompt.

npx hardhat node

Now the local network is up and running. It creates 20 nodes by default as shown below.

Hardhat Nodes

After the nodes are up, rerun deploy script. We should see the Hello World! text printed by sayHello() function.

Deploy Output

Now we learned how to deploy a smart contract to a network. When it comes to production environment, the --network will be substituted by real networks.

Testing Smart Contract Using Hardhat

· 3 min read

In the previous article, How To Create Your First Smart Contract, we created our first smart contract. Next step is to test it.

Setup Test Environment

We need to install few dependencies to setup our test environment.

yarn add -D @nomiclabs/hardhat-ethers ethers chai

@nomiclabs creates npm packages that makes working with hardhat much easier. It adds more capabilities and functions to easily work with hardhat.

@nomiclabs/hardhat-ethers is a hardhat plugin for integration with ether.js. Ether.js helps us to interact with Ethereum blockchain in a simple way.

ethers is a node package that contains complete Ethereum wallet implementation and utilities in JavaScript and TypeScript.

Next we need to install TypeScript dependency.

yarn add --save-dev ts-node typescript

Lastly, we need to install the test assertion library chai and related types.

yarn add --save-dev chai @types/node @types/mocha @types/chai

Now that we have installed everything to run TypeScript. So we need to change the file name of hardhat.config.js to hardhat.config.ts.

Next, open hardhat.config.ts file and add following import statements for ether package.

import "@nomiclabs/hardhat-ethers";

Now everything is done to write our tests in TypeScript.

First Test

In the previous article, we created 3 folders contracts, scripts and test to store related files. We need to now create a test file HelloWorld.ts inside test folder.

First we need to import required packages to run the test. So add below lines to HelloWorld.ts file.

import "@nomiclabs/hardhat-ethers";
import { ethers } from "hardhat";
import { expect } from "chai";

Next we use describe and it functions from mocha to write our test.

describe("Hello World", () => {
it("should say Hello World", async () => {
// Test code here
});
});

describe is used to structure and group tests in mocha. it creates tests. Now, inside the it callback function, add below 4 lines.

const HelloWorld = await ethers.getContractFactory("HelloWorld");
const hello = await HelloWorld.deploy();
await hello.deployed();

expect(await hello.hello()).to.equal("Hello World!");

First line picks the HelloWorld contract which we created in the previous article.

Second line deploys the contract to a network. In this case, the network is a test network spin up by hardhat and is dissolved immediately after the test. Everything is managed by hardhat.

Third line, await hello.deployed() makes sure that the contract is deployed. When we work with Ethereum, deployment will not happen instantly. This line waits to ensure that deployment is success.

Fourth line invokes the contract function and tests for the value returned.

Run Test

In order to run our test, go to the project folder in terminal and run:

npx hardhat test

Sometimes, you may get below error:

Error HH13: Your Hardhat project uses typescript, but ts-node is not installed.

In that case, install ts-node again.

yarn add -D ts-node

Then run npx hardhat test again. If everything went well, we should see the test passing successfully.

Hardhat test

We successfully created a test suite for our smart contract and executed it. In the next part, we will go through the deployment process.

SOLVED: Error HH606 - The Solidity version pragma statement in these files doesn't match any of the configured compilers in your config

· One min read

While working with Solidity, during compilation I got this error.

Error HH606: The project cannot be compiled, see reasons below.

The Solidity version pragma statement in these files doesn't match any of the configured compilers in your config. Change the pragma or configure additional compiler versions in your hardhat config.

This is caused due to mismatch in the compiler versions specified in hardhat config and that requested in solidity file pragma statement.

In my case, pragma in solidity file requested minimum version to be 0.8.0. But in hardhat.config.js the compiler version was 0.7.3. Updating version in hardhat config file to 0.8.10 fixed the issue.

How To Create Your First Smart Contract

· 4 min read

Smart Contracts are programs stored on a blockchain that run when predetermined conditions are met. We are going to create our first smart contract.

Create a new folder and navigate to it.

mkdir hello-smart
cd hello-smart

Initialize Git to convert the folder to a git repository. Then initialize Yarn to convert the project to a node package. You can also use npm also, instead of yarn.

git init
yarn init -y

The skeleton is ready. Open the folder in a code editor. I am using Visual Studio Code. In the editor, create .gitignore file and add just one line to it.

node_modules

This will prevent Git from pushing node_modules folder to Git server.

Hardhat

Hardhat is an Ethereum development environment for us. It is a tool for building and deploying contracts to any Ethereum network. It facilitates frequent tasks like running tests, auto check code for any errors.

Add hardhat as a dev dependency to the project.

yarn add -D hardhat

Even though we installed hardhat in our project, we are going to run through hardhat steps using npx command.

npx hardhat

We are presented with the first question to start a hardhat project.

Hardhat setup

Select the 4th option from the list which is Create an empty hardhat.config.js and press Enter. A new file hardhat.config.js will be created in our project.

Folder Structure

The typical folder structure for a smart contract looks like this:

project
- contracts
- mycontract.sol
...
- scripts
- deploy.ts
...
- test
- mytest.js
...

We store all our code for contracts under contracts folder. Files under scripts folder are used for deploying the contract. test folder contains test code.

Hardhat automatically takes code from contracts folder and compile each code. Also, when we run hardhat test command, it goes through test folder and run each tests.

First Contract

Create a file under contracts folder and name it HelloWorld.sol. .sol file extension is for solidity, which is the programming language of Ethereum. Lets start filling the file.

First step is to tell Solidity, what compiler we expect.

pragma solidity ^0.8.0;

pragma is kind of pre-compilation level. It says that we need atleast 0.8.0 compiler level for compilation. You can imagine above line as package.json in node projects which tells what versions of tools to be used.

Next add following to the file.

contract HelloWorld {

}

The contract syntax looks similar to a class. In lot of ways it has similarities to a class. Contract is a state container with functions that can mutate the state. Contract also has a constructor. This constructor will be executed only once when deployed to a network.

Now add the below function inside HelloWorld contract.

function hello() public pure returns (string memory) {
return "Hello World";
}

As we can guess this is a normal function that is public and returns a string "Hello World". pure represents that this function does not read or update the contract state. As we can see, our hello() simply returns a hard coded string. So it is a pure function.

Here is the complete contents of HelloWorld.sol.

pragma solidity ^0.8.0;

contract HelloWorld {
function hello() public pure returns (string memory) {
return "Hello World";
}
}

Compilation

Before compilation step, we need to verify that the compiler version in hardhat.config.js and what is requested in our solidity file matches. In our case, the compiler version in hardhat.config.js is 0.7.3. We need to update the version to 0.8.10 in hardhat config file. Then only it matches the version number in HelloWorld.sol file.

After making version changes, go to terminal and run:

npx hardhat compile

The contract should compile successfully.

Hardhat compile

Hardhat stores the compiled contract under artifacts folder which was dynamically created during compilation. If we open artifacts/contracts/HelloWorld.sol/HelloWorld.json, we can see all the information about our contract and also the bytecode which is required for Ethereum Virtual Machine.

After compilation, the next step is to deploy the contract to a test network. We will cover that part in the next article.